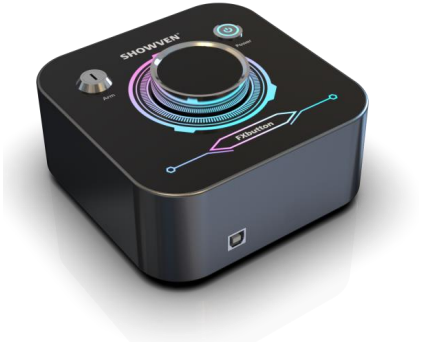
Showven FX Button

In stock


Description / Showven FX Button
The Showven FX Button is the go to for sleek, innovative, and simple control over your Special Effects machines. Designed to work with both Showven equipment and others, the FX Button features concise programming and functionality with smooth aesthetics to look great while controlling your special effects.
Specifications:
- Dimension: 165 x 165 x 90 mm
- Weight: 1.5kg
- Input: 100-240V, 50/60Hz
- Work Power: 10W
- Casing Material: Aluminum
- Battery Powered: Yes, two 18650 cells, 16h standby
- Interface: 1*USB Download; 1*3-PIN DMX OUT; 1*5-PIN DMX OUT
- Package: Suitcase
Features and advantages
- Compact size, powerful functions
- Support multiple DMX device and effects setting
- Timer function to tracking the consumable remains
- Built-in battery design
- JOG or timing trigger, and can also work with cycle mode
- Aluminum housing
- Durable suitcase package
- Easy to use
- Safety switch
- Both 3 and 5-pin DMX OUT, 5-PIN support DC5V achieve true wireless with DMX pen
_________________________________________________________________________
Showven Technologies Co., Ltd.
Thanks for choosing SHOWVEN® FXbutton, we wish it will bring you lots of exciting moments.
Please read the following manual carefully before operating this product.
Δ Product Description
The FXbutton is the most compact DMX console available on market, it is designed to be a
simple and easy to use console for party, DJ etc. applications. All settings can be finished with
an infinite rotary button simply yet efficiently.
Δ Features
Compact size, powerful functions
Support multiple DMX device and effects setting
Timer function to tracking the consumable remains
Built-in battery design
5 preset firing modes
JOG or timing trigger, and can also work with cycle mode.
Aluminum housing
Durable suitcase package
Easy to use
Δ Technical Specifications
\ DIMENSION: 165×165×90mm
\ WEIGHT: 1.5kg
\ VOLTAGE: AC100-240V, 50/60Hz
\ WORK POWER: 10W
\ WORK TEMP.: -20°C~50°C
\ INTERFACE: 3-pin and 5-pin XLR OUT, File download port
\ BATTERY: 2*18650 cells (customer buy it locally), standby 16h (3500mAH battery).
\ SAFETY SWITCH: YES
\ PACKAGE: durable suitcase
Δ Safety Considerations
1. Keep FXbutton dry and do NOT use in rain or snow.
2. Pull out power plug during thunderstorm or not use for a long time.
3. If any liquid is spilled on this machine, please power off immediately and clean it.
4. Unauthorized repair are prohibited, it may damage the machine.
Δ Structure of FXbutton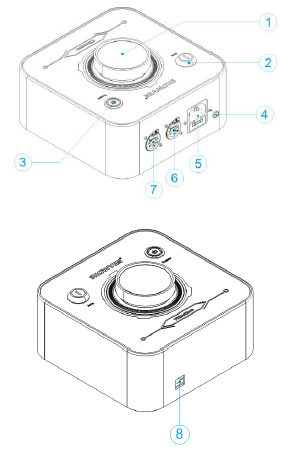
1. Button and Screen
2. DMX Arm switch
3. Power ON/OFF (the indicator light blinking when DMX armed)
4. AC Input indicator light
5. AC Input
6. DMX 5-PIN OUT (pin4 with 5V output to charge wireless DMX transmitter)
7. DMX 3-PIN OUT
8. Download port for software update
Δ Interface and Menu
1. Main interface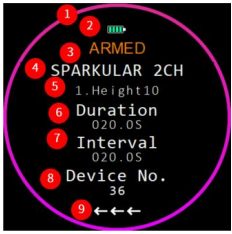
○1 : Timer Circle: Indicate the remaining consumables left based on the setting time
○2 : FXbutton Battery Volume
○3 : DMX Arm status. If shows “ARMED” here means machine enabled.
○4 : Device types
○5 : Effects
○6 : Duration
○7 : Interval
○8 : Device No.: device quantity. (shows DMX address range under custom device mode)
○9 : Firing mode rules (sync, center to ends, ends to center, right to left, left to right)
NOTE:
Menu switch disabled when DMX armed.
Switch Arm key under setting menu, FXbutton will switch to main interface automatically.
2. Setting Menu
Parameters in main menu show in below table, press “UP”/ “DOWN” to change the value,
please remember to press “SAVE” to save the setting.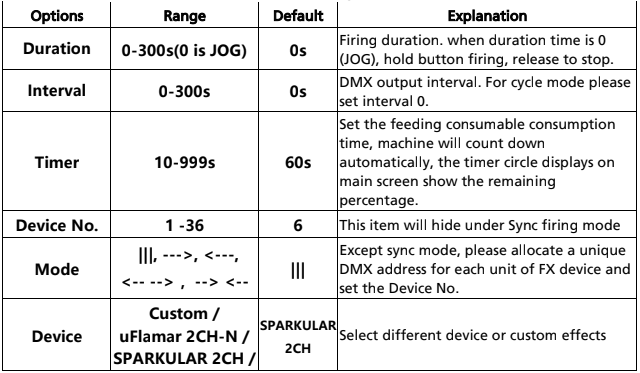
Δ Operation Guide
1. Press Power button to turn on FXbutton. The indicator light on power button will blink
three times.
2. Rotate the button clockwise or anti-clockwise to enter different setting menu interface.
3. In related setting menu, press the button to enter the editing mode (the edited value is red),
turn the button clockwise/anti-clockwise to change the value in the editing interface (slow
rotation adds or subtracts 1 each time, fast rotation adds or subtracts 5 each time), press the
button again to save the value and return to the setting interface.
4. Rotate the button can switch back to main interface.
5. After setting finished, switch the DMX Arm key to armed status (power indicator light flash).
6. Press the button to firing. It will firing automatically according to the settings, and also
shows the count down time, if press the button again during firing, DMX output stops. If
duration is 0, press and hold the button to firing, release to stop.
NOTE:
When using a non-custom device, the DMX device address needs to be set to 1, or calculated
according to the number of channels.
Except sync mode, please allocate a unique DMX address for each unit of FX device.
Δ Device Lab Download Operation
In the new version FXbutton (delivery time from SHOWVEN factory after 23th July 2024),
FXbutton with a new function that is to edit your own device lab with FXbutton_Editor
software. The operations are as below:
1. Power on FXbutton, connect FXbutton and computer with download cable. Open
FXbutton_Editor software find corresponding com port, click “connect”.
2. Click “open” to open the device lib. All preset devices will show it here.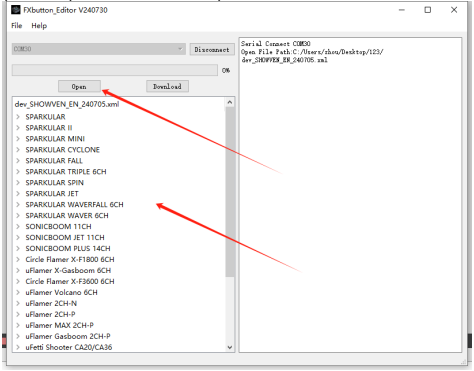
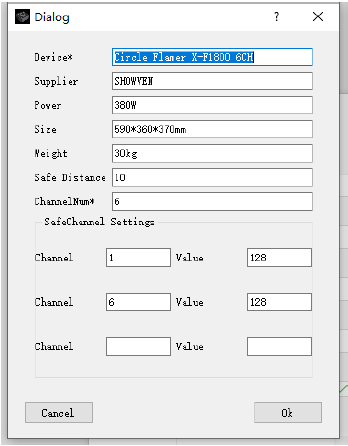
3. To add a new device please click “File / Add File”. Item with * are required data, Device is
the name of the device, ChannelNum means channels related device occupy. Safety
Channel Settings is the safety channel setting information. If there is no safety channel, it
can be left blank. If need to assign a safety channel, it can’t exceed the ChannelNum.
4. Operator can also create, edit or delete device or effects by right click the mouse on
device, effect or blank area of the device lib region.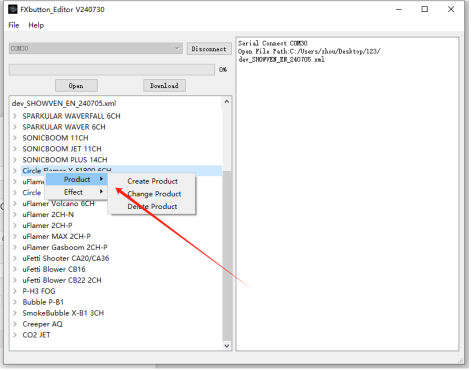
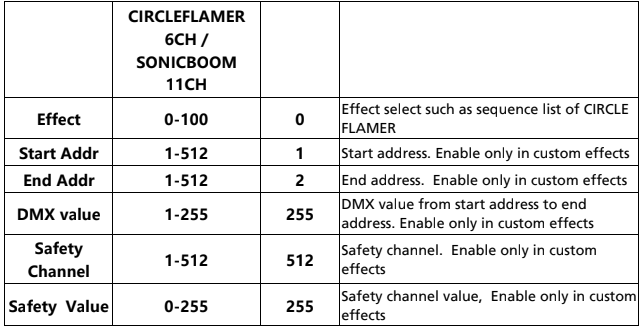
For example when create an effect it will pop up a dialog as below. Vaule is the DMX
value of the effect, SafeChannel is value of safe channel, when there are value in both
Value and SafeChannel, DMX value will overwrite SafeChannel value.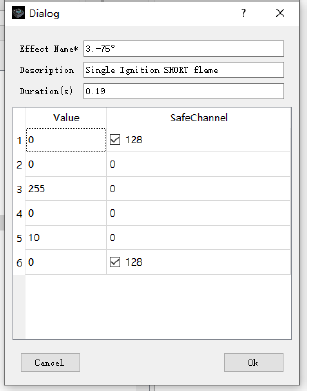
5. Click “Download” to download device lib to FXbutton, wait for the progress bar to
complete, restart the device, and the library file is updated.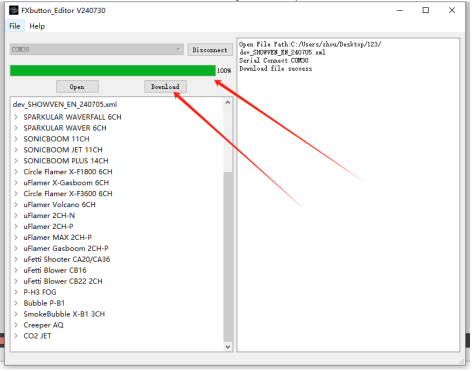
Δ Battery Installation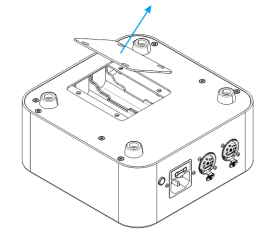
Remove the battery cover at the bottom of the FXButton as shown in the figure, and two
18650 cells needed, battery is not included in standard configuration, please prepare it by
yourself.
1. Please install battery in the right direction;
2. After installing the battery, you need to connect to AC power or press the RESET button near
battery to activate the battery.
3. When AC power supply is connected, the system will manage battery charging automatically,
even POWER button is stay at OFF status;
4. To elongate battery service life, no matter use it or not, please charge the battery once per
month;
5. Battery specification is flat head, 3.7V or 4.2V.
Δ Warranty Instructions
\ Sincere thanks for your choosing our products, you will receive quality service from us
\ The product warranty period is one year. If there are any quality problems within 7 days after
shipping out from our factory, we can exchange a brand new same model machine for you
\ We will offer free of charge maintenance service for machines which with hardware
malfunction (except for the instrument damage caused by human factors) in warranty period.
Please don't repair machine without factory permission
Below situations NOT included in warranty service:
\ Damage caused by improper transportation, usage, management, and maintenance, or
damage caused by human factors;
\ Disassemble, modify or repair products without permission;
\ Damage caused by external reasons (lightning strike, power supply etc.)
\ Damage caused by improper installation or use;
For product damage not included in warranty range, we can provide paid service.
Invoice is necessary when applying for maintenance service from SHOWVEN®.